If the development of color saturation makes your photo more emotionally attractive, why limit yourself to a selective saturation rather than a global saturation? In which situations is selective saturation more effective in conveying the emotions of your photo than you want to share? And what photo development tools can be used to make a selective saturation?
I will share with you:
- What is the interest of selective saturation
- A reminder of the theory of emotions
- A practical case on how to use selective saturation
- Which tools and applications for making a selective saturation
Before We Begin
Succeeding in making remarkable photos means successfully capturing and sharing emotions in your photos. Focused on the theory of emotions, I designed a 6-step method for learning photography first with what you feel. Development is the 5th step to achieving it, and mastering color is one of the 6 essential development techniques to be known in photography.

Develop Emotional Color Attraction To Your Subject
Thanks to high saturation, an intense color attracts the eye. You can take advantage of this visual reflex through the development of saturation and orient the emotions of your photos. But rather than having a uniform saturation on the whole image (we speak of global saturation), you can target specific areas: that’s selective or local saturation.
The selective saturation is particularly effective to highlight your subject or details of it in relation to its environment. This adds a contrast of color intensities that energizes the composition of your image. And reinforcing the image composition, it’s making the eye linger and dive into your photo. All the emotions of your subject and the techniques of shooting, light and composition are thus reinforced.
A Quick Reminder About The Theory of Emotions
All types of emotions that we feel can be represented on a wheel with 8 primary emotions according to the theory of emotions of Plutchik. These primary emotions come in varying intensities (the most intense are at the center) and combine in 24 other emotions.

No Selective Saturation Without A Subject: A Practical Case
How to use selective saturation well? First, it must be at the service of your subject. Generally, the saturation of the subject is increased and the intensity of its colors is contrasted with desaturation of the subject’s environment. Then, this saturation contrast must be correctly tuned: it must be pushed sufficiently to have an effect, but without it being noticeable to the detriment of the subject.
Finally, you can combine this saturation contrast with vignetting or dodging/burning certain areas of the image. So to highlight the subject, you can lighten and saturate your subject, and additionally darken and desaturate its environment.
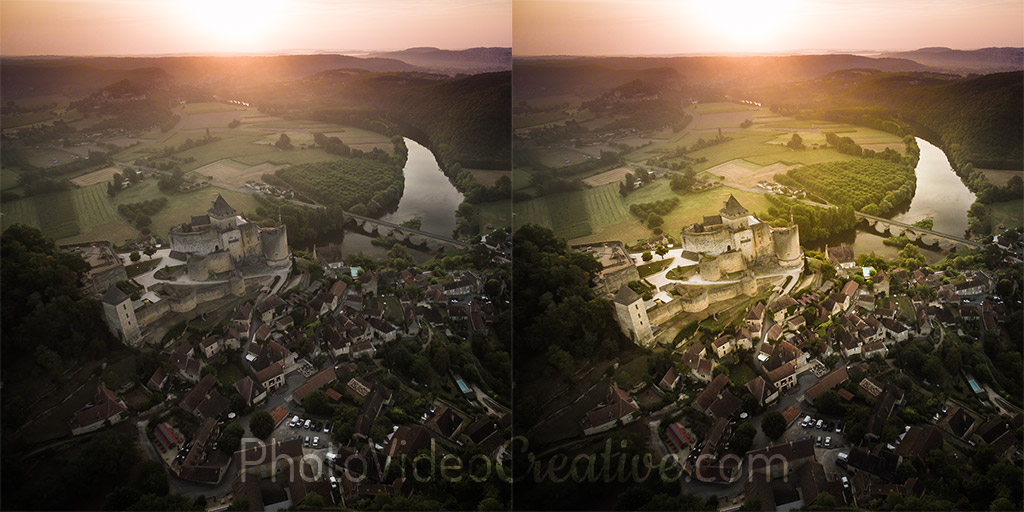
Let’s see a practical case with the picture above of the Castle of Castelnaud-la-Chapelle in Périgord, France. I made this aerial shot with my drone at the edge of the village. It is actually 3 shots assembled in vertical panoramic to form the final photo. What I liked about this landscape was the castle dominating the whole Dordogne valley under a rising sun. The composition was interesting to me but I wanted the eye to be immediately caught by the main subject (the castle of course) and not be too distracted by the cars parked on the village plot (I always refrain from retouching my photos by removing undesirable elements :-)). Therefore, I use 3 techniques:
- Vignetting: the corners of the image have slightly darkened tones
- Global Desaturation: the colors are made less intense over the whole image, without being monochrome
- Selective Saturation: the elliptic zone including the castle, the river and the fields has a reinforced color saturation. In addition, I slightly lighten the tone of this area to detach it from the rest of the image
With this development, my photo has a more dramatic effect which highlights my emotions of delight (joy + surprise) in front of this secular building and the perspective on the valley.
Tools To Practice Selective Saturation
Selective saturation is a development technique that is only available in advanced photo software applications. We can mention 2 tools among the best known:
- Adobe Lightroom, available in PC / Mac version (paid), and in mobile version (free) for smartphone/tablet for iOS and Android
- Google Snapseed, available only in mobile version (free) for smartphone/tablet on iOS and Android
Technically, Adobe Lightroom is the most accurate and provides an almost complete feature set for development in its free version for mobile. But to take advantage of selective development tools such as selective saturation, you must subscribe to Adobe Creative Cloud for Photo.
Google Snapseed also has extensive possibilities in development although less precise, but it has the merit of being free. Its main disadvantage is that it does not exist on PC or on Mac. You must work on a smartphone or tablet.

Do you already have any idea of the use of selective saturation for your photos? What types of photo would you like to experiment with? Why do you think this will bring out your emotions? Leave me your comment, I will answer with pleasure.
Let’s Go On Together!
Learn how to photograph with my 6-step method to make your photos first with your emotions. An intuitive approach that focus on what you are feeling, before considering any tools and techniques!
Then understand why development in photography is essential in the expression of your emotions and explore the 5 different techniques of color development:
- Color of ambient light: developing the white balance
- Intensity of colors: developing color saturation
- Attracting to your subject with color: developing selective/local saturation (this post)
- Harmony of colors: developing a color palette
- Monochrome tones: developing in black and white
Do not miss my future posts to better capture and share your emotions in picture: subscribe to my newsletter and get my free eBook!
Do you like what you’ve learned? Share this article with your loved ones!